To consumers, product quality is everything. No matter how expensive it is, people will buy things that have the best quality.
Product quality is directly tied to a brand’s reputation. No matter how much they cost, you’ll want to protect and preserve these high-quality products as much as possible.
There are different methods for doing this, and for printed products like stickers, lamination is the recommended one.
Today, we’ll guide you through laminating your stickers. There are multiple advantages to doing this, the main one being preserving and protecting your stickers from wear and tear. While you can undoubtedly get them laminated by the printer, it’s essential to know how to do it yourself as well.
Another reason to learn how to do it yourself is the limitations on customization many printers have. You can avoid all that by doing things yourself and being free to do what you want.
Now, let’s get started.
Choose the Material You Like
The first thing you want to do is get some stickers to laminate. Usually, you can laminate any sticker and provide an extra layer of protection. However, the process will thicken and harden the sticker, so it would be better to use it on a curved surface. Another thing to be mindful of is the laminating method you plan to use.
Various factors must be considered, such as where you’ll be placing the stickers and the weather conditions. If you are looking to use them on items exposed to water, like food containers and bottles, it’s best to get a laminate that can protect the sticker rather than settling with a common one. But if you are going for something like photo stickers, then we suggest a laminate that won’t degrade the photo’s integrity.
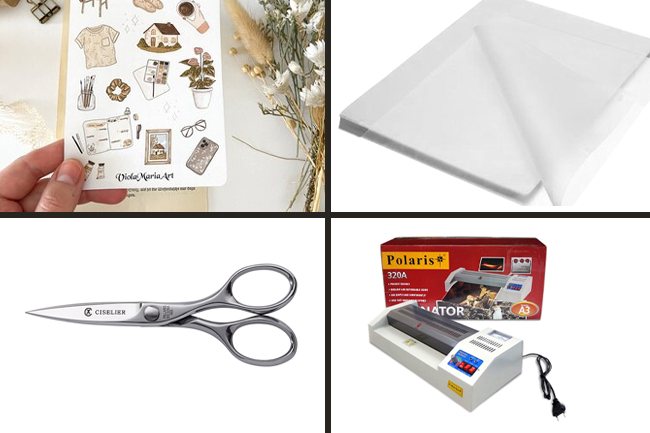
Materials You’ll Be Needing
- The sticker you’ve designed and printed out
- Laminating sheets/pouches (make sure they are the right size)
- Scissors or any cutting tools you can get your hands on
- Laminator/laminating machine
Once you’ve got your stuff, it’s time to proceed to the lamination process.
Step-by-Step Lamination Guide
- Start by trimming off any excess paper around your sticker so that it’ll fit nicely around your laminating sheet. You will want the centre of the sticker to be about ¼ inches from the border of the laminating sheet. (Note: if you dislike cutting any excess paper, we recommend printing the stickers in a die-cut format.)
- Once the stickers are all prepped up, stick them into the laminating sheet. Make sure that there are no air bubbles or creases underneath it.
- After everything is all ready, run the sheet through the laminator. Be sure to follow the machine instructions for the best results and avoid any issues. Most common laminators will need about a minute or two to heat up and feed the sheet through.
- Retrieve the sticker and allow it to cool before removing the sheet. Once it has cooled, the laminate will be rigid and transparent.
- Go ahead and repeat this process for all of the stickers you want laminated. Be extra careful not to touch the laminated surface, as you may leave fingerprints, which will be sealed in.
- You’re all done! Your stickers are laminated and protected. Feel free to use them in places that need a little colour.
There you have it! Now, you can laminate some fantastic stickers all on your own. But if that seems like a lot of work for just laminating stickers, you can always approach professionals. There are lots of sticker printing companies out there that can help you out.
Final Thoughts
Knowing how to laminate your stickers yourself can be beneficial if you plan to use them for your business or hand them out to friends and family. The extra layer of protection means you won’t have to worry about your design ideas getting scrapped by an unfortunate accident or scratch. Now, you can keep creating without worrying that it’ll eventually get destroyed by things out of your control.